“When you see someone putting on big boots, you can be sure adventure is about to happen” (Winnie the Pooh)
Blister prevention
Blisters can ruin a great hike, so unless you can convince someone to give you a piggy-back, you are going to need to know some blister prevention tips.

What is a blister?
Hikers are prone to get friction blisters. Everyone has an opinion on what to do (or not do) - to be fair what works for you may not work for others.
Here are a few common causes:
- New boots, or old boots you haven't worn for a while
- Old boots that have shrunk after being wet
- Soft sensitive skin
- Hot days and hot feet
- Trails that are very flat or regular (no variety in the step)
- Ignoring the initial ‘hotspot’ on your foot
Before your trip
Flippers or feet?
Buy the right boots and make sure they are comfortable - easier said than done. Check out this excellent guide to hiking boots here.
Typically, feet get bigger after a day's hiking. If in doubt go for bigger, not smaller. European boots are famous for being too narrow for kiwis (bare foot culture) so look for another brand if you have flippers for feet. A bendy boot that is comfy in the shop won't be stiff enough to protect your feet on 10 days of stony Himalayan trails, but will be great on the Abel Tasman Track.
Ask the shop assistant if you don't know the pros and cons of the different boots/shoes and make sure you know the compromises you are making. For crampons you need a stiffer boot and strong upper (so straps don't cut circulation). Many boot shops will let you refund after a couple of days (as long as you only wear them inside). It can take a few hours to feel if the boot is right.
These boots are made for walkin'

Wear or break in your boots or they are "gonna walk all over you". Make sure you go on a few short walks and hikes in your flashy new boots to break them in. If you have insoles, wear them from the beginning as they also need breaking in time. We swear by walking in a stream to break in boots, one hour of wet boot walking = 1 week of dry boot walking we reckon - especially if they are leather as your feet can then shape them. However, these days (sadly) most boot makers stuff foam inside the lining so they are comfortable from day one. Why are we sad? The foam makes the boots really heavy after river crossings and when foam eventually disintegrates the boot gets too big for you.
Pack the right socks
Wearing the right socks helps blister prevention. Your socks should cover your feet nicely, without being too tight or too loose. Try wearing socks made of breathable fabric to transport moisture away from your feet e.g. wool. Some farmers work socks have coarse nylon yarn for strength and are not made for rubbing across your feet for 6-8 hours a day like a cheese grater. In the old days everyone wore two pairs of socks. Does anyone know why? Lastly, watch your feet don't over heat as this helps blisters form.
Trim your nails
Trim your toenails to prevent them getting jammed into the front of your boots - especially on extended downhill sections. This can cause severe bruising of the nail bed. Whoa – that really sounds like something you don't want to happen. Another trick is to tighten your boots, so as to shove your foot back in the boot alleviating pressure on the toes. If tightening causes problem higher on the ankle, then tie laces off half way, and then looser on the top section. A good emergency trick is to remove the insole to gain space.
Strap any known problem spots
If you are prone to blisters in a certain spot be quick off the mark and place strapping, a blister pad, or Trampers Friend over the problem area before you head off hiking. This will decrease friction from the get go.

During your hike
If your socks get wet during the day dry and air them out overnight.
Pack (at least) 2 pairs of socks to always have a dry pair at hand (feet). This way you never need to take the gamble of not being able to dry socks out overnight and having to put on soaking wet ones in the morning again. Also (hiking) socks provide better protection to your feet from sandfly bites – try socks and jandals as your hut footwear if you are prone to getting bitten. Socks and jandals are a fashion statement so wear them with confidence.
Talk to your feet
Be aware of the state of your feet at all times. Check up on them when you take a break - are they still there, are they enjoying the views? Monitor them for any hotspots.
Where there is smoke there is fire
Try to be very aware of a sensation of 'heat' or a pressure point on your foot as it will quickly turn into something untreatable. Once you have a hotspot, treat it immediately to prevent a blister from forming. If you caught it soon enough cover with a few centimetres of good quality sports tape (usually cloth on one side and sticky on the other) or moleskin to prevent further rubbing.
It's going to be a big challenge to get tape to stick if your feet have lost their mornings charm. If you can, clean and dry the skin. Once the tape is applied rub it to warm it up a little, this mobilises the adhesive so it sticks better to your skin.

Wet boots - don't panic
Although we often read elsewhere that wet boots give you blisters, we have well and truly sunk this theory - which often is a single person’s (n=1) type experience.
Let’s elaborate…
We have taken thousands of folk hiking for 25 years, on river hikes, dry hikes and pretty much anywhere type hikes - over 100,000 hiking days we think. It’s common on the first day of our dry-boot trips for blisters to arrive by day's end, it's almost unheard of if the first day is a wet-boot day. End of story!
It's all over rover - blisters are knocking on your door
Last ditch. Take your boots off whenever possible (to cool feet) and soak your feet in water (stream) whenever you get the chance. This will reduce swelling of your feet and hence reduce possible tightness in your boots. Consider removing the innersole to make more room - trust us it works. Loosen boots right off - more rubbing at low pressure is better than some rubbing with high pressure - especially if it's in a different spot. Try different socks. Swap boots with someone for a while (don’t know about that one, there might just end up being two of you with blisters).
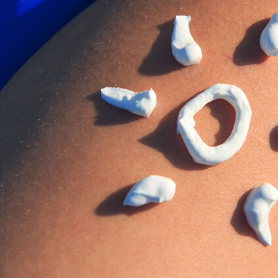
Cover the blister
As popping blisters can lead to infections they say you should just cover up blisters if possible. Use a piece of moleskin to cover, cutting a hole (donut) slightly larger than the blister into it and stick on. You may need to loosen your boots now as your foot will take up more room. You can find other things to make the donut out of too - old style sleeping mat, a rolled (like cigarette) and circled bit of sports tape. Then tape over the donut to protect the blister.
Pop the blister
If the blister is too big to manage you might just have to pop it. To start with clean the area with iodine or soap. Use a flame-sterilized needle to pierce the blister, but try and leave the skin on. Push fluid out whilst acting like it hurts even if it doesn't. Cover the spot with a blister patch or plaster, then cover the whole shebang with a donut dressing and sports tape (as above) to make sure nothing moves. You get to have chocolate right away as a wounded hero.
We hope these tips keep you and your feet going on your next hiking trip. Happy feet make happy hikers.
 Kiwi-Style Hiking
 Great Walks
 Hiking Tours
 Alpine Hikes
 Custom Groups